
While Ubuntu supports installation to a btrfs partition, it doesn’t take full advantage of capabilities of btrfs, specifically making use of subvolumes and snapshots, which is kind of the whole point of btrfs.
If you’re going to dual boot (or multiboot) with other distros, from a subvolume, and you install Ubuntu first and follow this workaround, you’re set. But if you have existing Linux distros and want to install Ubuntu to a btrfs subvolume alongside them after the other distros were installed, you can’t follow that workaround because not only does the Ubuntu installer not support btrfs subvolumes, but the current 24.04 installer forces you to format the existing btrfs root filesystem and you cannot uncheck the option.
There is a workaround that’s a bit annoying, but makes it possible. That is to first install Ubuntu in a virtual machine, then back up the Ubuntu root directory and copy it over to a new btrfs filesystem on your physical machine. The process overall looks like this:
- Install Ubuntu to VM.
- Back up Ubuntu root from VM, copying to another drive (or network location).
- Restore the Ubuntu root backup to a fresh btrfs subvolume on the target physical machine.
- Install grub on the physical machine.
- Generate initramfs.
- Update grub config.
- Ensure UEFI entry is created on the physical machine.
Ubuntu Installation on VM#
I won’t cover this part as there are tons of tutorials out there on the internet. The only noteworthy mention here is to ensure you don’t install any VM guest tools. For example, in VirtualBox there is a guest-utils package for most distros to provide better graphics support, host and guest clipboard access, among others. You don’t want to install these additional tools because they won’t work properly on your physical machine, so we don’t want to copy any kernel modules or other config files specific to the VM hypervisor you’re using to initially install Ubuntu.
When installing to the VM, make sure you choose btrfs as the root filesystem. Even though we’ll later create a new btrfs partition on the target physical machine, choosing btrfs during install will make sure to install the btrfs utilities into the root filesystem, so we can properly generate the initramfs file on the physical drive.
If you forget to choose btrfs at install time, when you later try to generate the initramfs file, it will fail with this error:
W: /sbin/fsck.btrfs doesn't exist, can't install to initramfs
If you forgot, you don’t have to start all over again and reinstall. There is a workaround I will detail later when we get to that point. But it’s just much easier to do the install up front with btrfs.
The TLDR is: Only install vanilla Ubuntu on the VM with btrfs filesystem for root and don’t install any further VM-related tooling. Once you’ve installed Ubuntu, don’t reboot. Instead, choose to continue testing Ubuntu and proceed with the rest of these steps.
Backup your system#
Open the terminal in Ubuntu.
The Ubuntu installer mounts your drive (probably /dev/sda on a VM) to /target to do the install, and it leaves the mount points intact after the installation is complete. This is convenient as we don’t have to worry about mounting the new system. After the installation is complete, and you’ve selected to continue testing Ubuntu, you can verify the mount points are still intact:
$ mount | grep sda
/dev/sda2 on /target type ext4 (rw,relatime)
/dev/sda1 on /target/boot/efi type vfat (rw,relatime,fmask=0022,dmask=0022,codepage=437,iocharset=iso8859-1,shortname=mixed,errors=remount-ro)
/dev/sda2 on /target type ext4is the root filesystem./dev/sda1 on /target/boot/efi type vfatis the UEFI partition.
cd into /target and then create a tar ball of the installed root file system:
cd /target
sudo tar -cvpzf ubuntu-24.04-backup.tar.gz --exclude=/target/ubuntu-24.04-backup.tar.gz --one-file-system .
Once that’s done, copy the /target/ubuntu-24.04-backup.tar.gz file to another drive, or over to a network share. Once copied, you can power off the VM - you can even delete it - as we no longer need it.
Restore Your Backup#
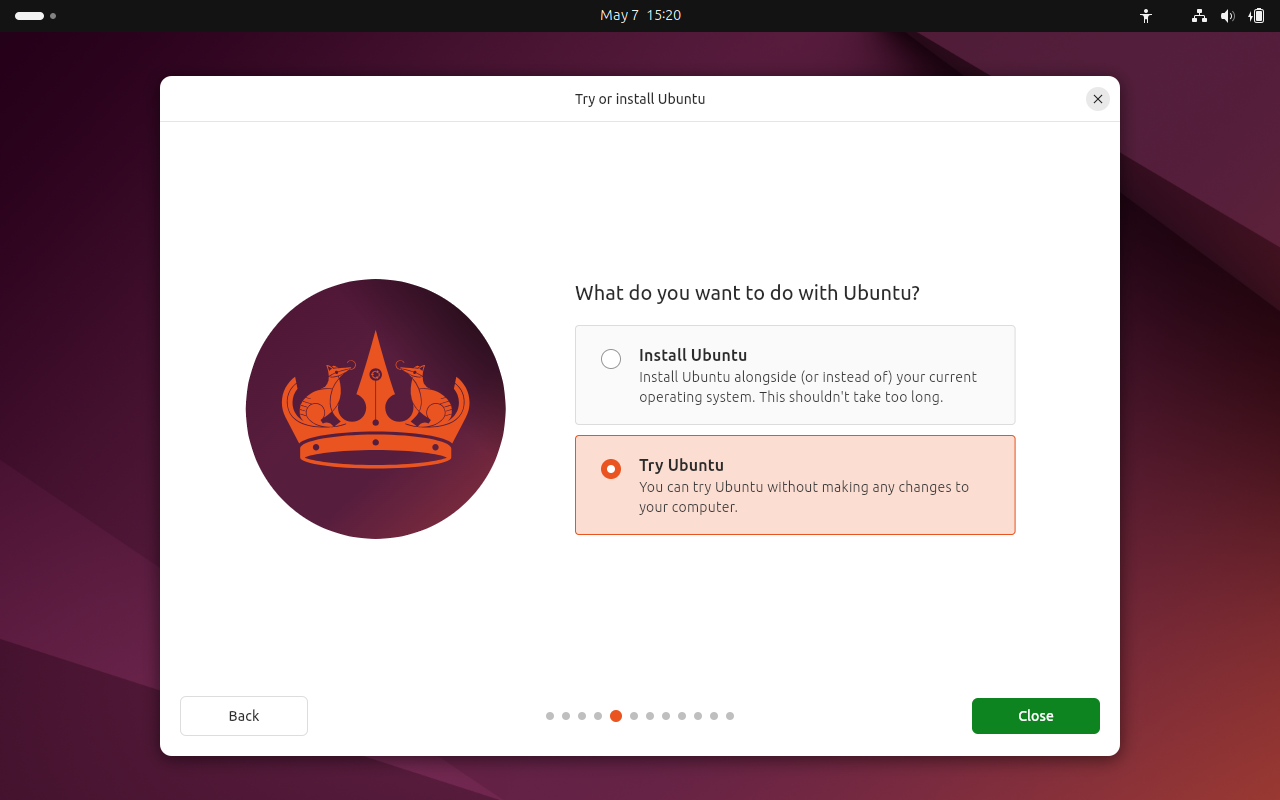
Now go to your physical machine and boot it up from the Ubuntu live image. Once the live image presents the dialog to try or install Ubuntu, choose to try (do not install):
Partition disk#
We’ll create 2 new partitions on the disk: one for the UEFI partition, then one for the root filesystem.
sudo cfdisk /dev/sda
cfdisk will ask to create a new partition table. Select gpt.
Next, create the two partitions. Here’s an example:
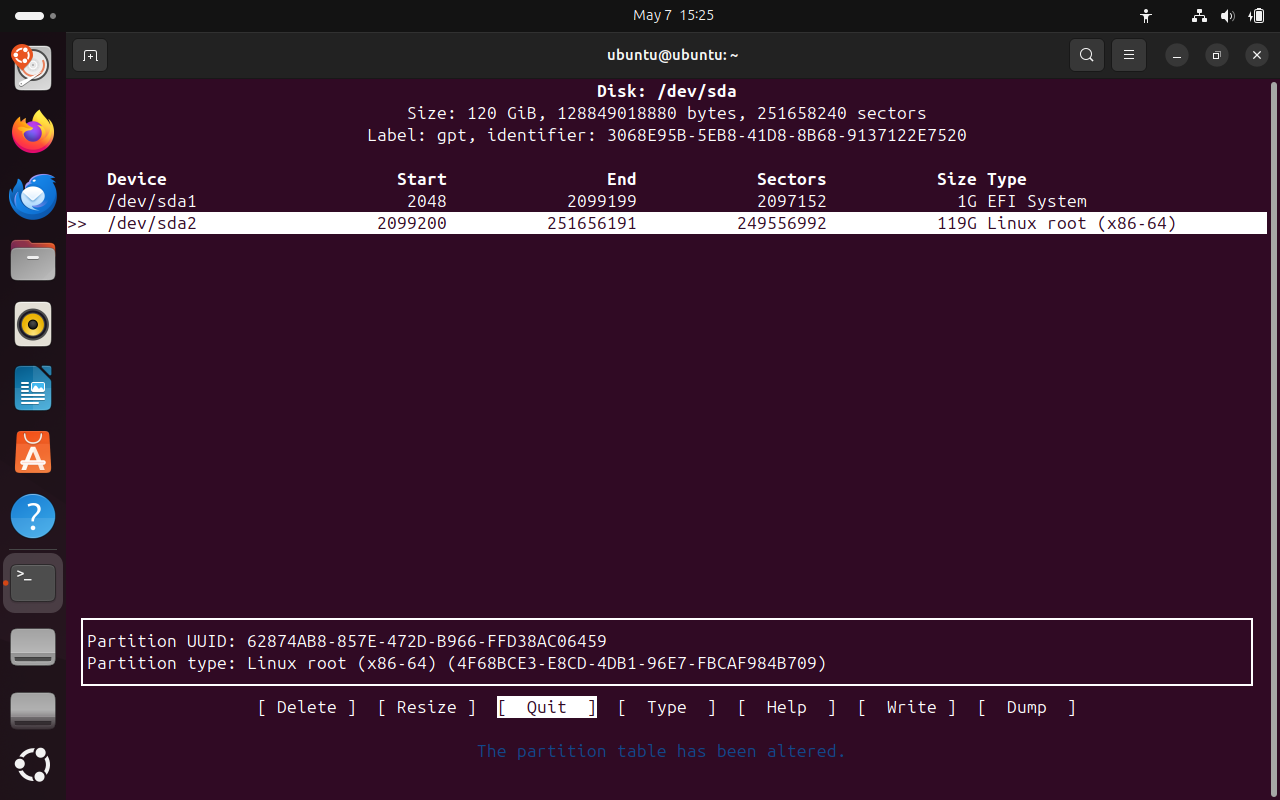
Make sure to set the partition type for /dev/sda1 (the UEFI partition) to EFI System. Then set the /dev/sda2 partition (root filesystem) to `Linux root (x86-64).
Finally, write the partition table, then exit cfdisk.
Format partitions#
Next we’ll format the EFI partition:
sudo mkfs.fat -F 32 /dev/sda1
sudo mkfs.btrfs /dev/sda2
Create btrfs subvolume for Ubuntu#
We can now create the btrfs subvolume, where we’ll restore our backup. First, mount /dev/sda2 (where the Ubuntu root will live):
sudo mount /dev/sda2 /mnt
Create the btrfs subvolume, which we’ll name @ubuntu:
sudo btrfs subvolume create /mnt/@ubuntu
Now, unmount /mnt:
sudo umount /mnt
We’ll remount /dev/sda2 again, but this time we’re mounting the @ubuntu subvolume instead of the root btrfs filesystem:
sudo mount -o subvol=/@ubuntu /dev/sda2 /mnt
Now let’s mount the EFI partition:
sudo mount --mkdir /dev/sda1 /mnt/boot/efi
Extract ubuntu backup to mounted subvolume#
We’re now ready to restore our backup. Make sure you have your drive (or network share) containing your Ubuntu backup tar file we created earlier (ubuntu-24.04-backup.tar.gz) and untar it to /mnt:
sudo tar -xvpzf /path/to/ubuntu-24.04-backup.tar.gz -C /mnt --numeric-owner
Note about network drives: While not necessary, it’s very convenient to have a network drive at home. For example, I run an NFS and Samba server on my home Arch Linux server, on a 24TB hard drive which allows me to easily store retrieve data like this without having to plug in a separate drive.
So in my case I mount my NFS share to save and restore my Ubuntu backup. If you wanted to do the same with NFS, you’d first need to install the NFS client utilities in the Ubuntu live image:
sudo apt update
sudo apt install nfs-common
sudo mount --mkdir 192.168.1.200/mnt/data0 /data0
This allows you to then extract the backup directly from the network share to your machine’s partition like so:
sudo tar -xvpzf /data0/linux-roots/ubuntu-24.04-backup.tar.gz -C /mnt --numeric-owner
Anyway, not required, but for those of you who might be running a home server with a decent storage setup, it’s super convenient to not have to deal with external drives, and just rely on your home network storage.
Next mount /dev, /proc, /sys under the Ubuntu root filesystem we just restored:
sudo mount --bind /dev /mnt/dev
sudo mount --bind /sys /mnt/sys
sudo mount --bind /proc /mnt/proc
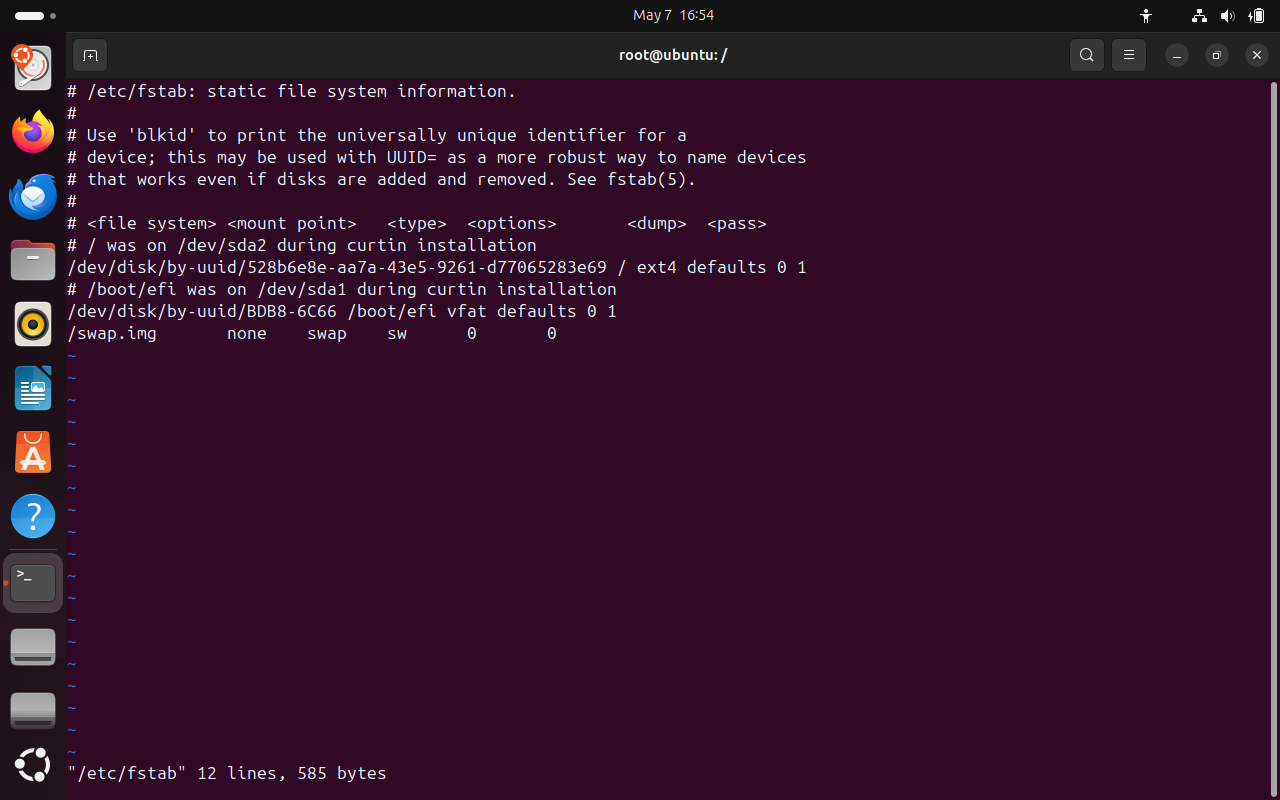
Update /etc/fstab#
The backup from the VM will have the UUIDs of the VM drives in the /etc/fstab file. We’ll need to change those entries to point instead to our physical drives.
chroot into the restored Ubuntu environment:
sudo chroot /mnt
Edit the /etc/fstab file. You can edit with nano or vi if you’d like. You’ll see something like this:
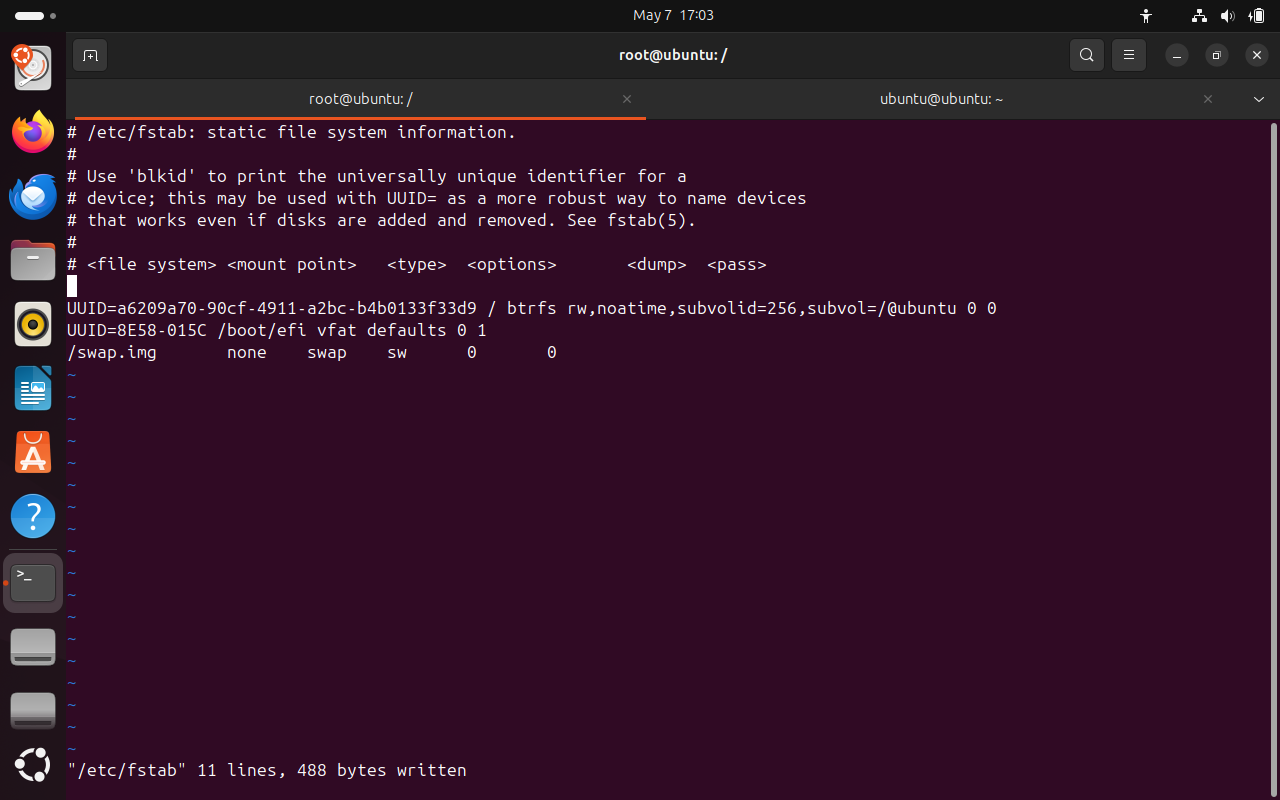
We’ll need to get the UUIDs of the physical drives. In a new terminal window or tab, run these commands:
sudo blkid /dev/sda1
sudo blkid /dev/sda2
On my system, blkid shows me:
/dev/sda1: UUID="8E58-015C"
/dev/sda2: UUID="a6209a70-90cf-4911-a2bc-b4b0133f33d9"
Copy the UUID for each of those partitions over to /etc/fstab, replacing the VM IDs that it currently has.
You’ll also need to get the ID for the @ubuntu btrfs subvolume:
sudo btrfs subvolume list /mnt
In my case, the ID was 256. That will likely be your ID as well, if this is the first btrfs subvolume you’ve created on the drive.
Make sure to update the /etc/fstab file to reflect the identifiers above. It should look something like this:
Once done, save the file and exit your text editor. Stay in the chroot environment for the next part.
Install bootloader, initramfs#
Install grub:
grub-install
Update initramfs:
update-initramfs -u -k all
As mentioned earlier, if you forgot to install Ubuntu on the VM with the btrfs filesystem initially, you’ll get an error:
W: /sbin/fsck.btrfs doesn't exist, can't install to initramfs
To fix this, open a new terminal window - making sure you’re in the live environment, not the chroot environment - and run this command:
sudo cp /sbin/fsck.btrfs /mnt/sbin
Back in the chroot environment, rerun this command:
update-initramfs -u -k all
Next, update grub config:
update-grub
Exit the chroot environment:
exit
UEFI entry#
grub-install should have already created the UEFI entry on your machine. If it didn’t, we can manually create one with the tool efibootmgr.
View existing UEFI entries
efibootmgr
You should see entries like this:
BootCurrent: 0004
Timeout: 0 seconds
BootOrder: 0004,0000,0001,0002,0003
Boot0000* UiApp	FvVol(7cb8bdc9-f8eb-4f34-aaea-3ee4af6516a1)/FvFile(462caa21-7614-4503-836e-8ab6f4662331)
Boot0001* UEFI VBOX CD-ROM VB2-01700376 	PciRoot(0x0)/Pci(0x1,0x1)/Ata(1,0,0){auto_created_boot_option}
Boot0002* UEFI VBOX HARDDISK VBbddbe21d-850647bc 	PciRoot(0x0)/Pci(0xd,0x0)/Sata(0,65535,0){auto_created_boot_option}
Boot0003  EFI Internal Shell	FvVol(7cb8bdc9-f8eb-4f34-aaea-3ee4af6516a1)/FvFile(7c04a583-9e3e-4f1c-ad65-e05268d0b4d1)
Boot0004* Ubuntu	HD(1,GPT,a86974d5-1131-40a6-a5b4-a028228ddb31,0x800,0x200000)/File(\EFI\ubuntu\shimx64.efi)
Note this line:
Boot0004* Ubuntu HD(1,GPT,a86974d5-1131-40a6-a5b4-a028228ddb31,0x800,0x200000)/File(\EFI\ubuntu\shimx64.efi)
That’s the line you want to see. If an Ubuntu entry is present, you can move on. If it’s missing, let’s create it:
sudo efibootmgr -c -d /dev/sda2 -L Ubuntu -l '/EFI/ubuntu/shimx64.efi'
If you messed up the entry, you can delete it:
sudo efibootmgr -B -b 0004
The -b 0004 argument number should match the number for the Ubuntu EFI entry you want to delete. If it’s Boot0004 then pass it as 0004.
After making a change, you can always confirm the UEFI entry by running efibootmgr with no commands (you also don’t need sudo if you’re just listing entries or viewing help). If you want to print the help menu, run efibootmgr --help.
Unmount the installation drive and reboot#
You can now unmount everything under the Ubuntu installation directory (/mnt) and reboot:
sudo umount -R /mnt
reboot
Your system should reboot and load into Ubuntu.
If you didn’t install the VM as btrfs#
If you didn’t use btrfs for the VM installation, even if you use the workaround I showed above, after rebooting and confirming you’re able to log in and the system is working, you’ll be missing the utilities for btrfs to manage your subvolumes and snapshots. So after rebooting into your newly restored system, you’ll want to do the following:
sudo apt update
sudo apt install btrfs-progs
btrfs-progs will allow you to manage your subvolumes and snapshots. For example, to list subvolumes:
sudo btrfs subvolume list /
Which will show our newly installed @ubuntu subvolume:
ID 256 gen 96 top level 5 path @ubuntu
Final notes#
This process works for other Linux distros as well. I have multiple distros installed under separate btrfs subvolumes, which allows me to boot into anything I want, without having to create separate partitions - which saves a lot of disk space and allows me the flexibility to snapshot any of the distros (and boot into those snapshots as desired).
I really wish the Ubuntu installer allowed us to install to a btrfs subvolume. The entire point of having btrfs is to use subvolumes and snapshots. Offering the option to use btrfs as the root filesystem, as Ubuntu does, seems rather pointless. Perhaps some day they will add this capability into the installer but until then, this method works.